
The prototype
The prototype uses the principle of always having to press two buttons simultaneously to make anything happen. This is to reduce the chances of something being 'bumped' or activated in error. There are two main types of buttons, those on the track lines known as 'inner' buttons and additional buttons that are away from the track lines known as 'outer' buttons. Outer buttons are grouped by similar function and there are color coded backgrounds for the different types of function. For example, blue is used for turnout controls, red for signals, green for power related things, brown for axle counters, and other items simply use the color of the desk, which is a light green, gray color.Now, controlling a model train layout from a computer screen (or even a small physical control desk with actual push buttons) does not simply map to prototypical items. In the model world there are things to be done that cannot be controlled in the real world, such as activating sound effects, ignoring sensors, powering things on and off, and even starting natural events such as dusk and thunderstorms. Rotating a turntable does not fall under the domain of the signal box personnel, but model train operators need to do so. In addition, there are some things that are just not practical to model, for example axle counters, radio communications with train drivers, etc. Our model empires are often far more than just a single train station, we have to do things with trains that have left the narrow scope of a few tracks in a small station, and this results in interfaces that cram a lot of track into a much smaller area than would be used in real life. Using a computer screen to emulate a physical desk also has some hurdles, you cant press two button at once! (But we can handle multiple sensors connected to multiple button on a physical control desk.)
As a result, many things do not, and will never, match the prototype. This is why I regard this effort to be honoring the look and feel of the real thing rather than trying to simulate every detail.
Here are some of the items I implemented. Each of the push buttons and switches that can be clicked with a mouse can also be triggered by a physical switch connected to a sensor. This allows fairly prototypical control to be achieved with a simple panel of switches.
Turning the desk control on and off
Logically one needs to switch the whole desk on and off since sometimes I want the computer to be in control and at other times we may want people to be able to select routes. Each station can have its own on/off (Ein/Aus) switch, and a single desk can be made to control multiple stations.
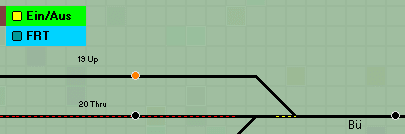
 Clicking on Ein/Aus or flipping a physical switch will turn the desk on, which is indicated by a yellow light.
Setting routes
Of course the most important function is the setting of routes. Once the desk has been switched on, the software will respond to sensor inputs or screen clicks on objects that represent buttons. Small black circles represent 'inside' buttons used to set routes.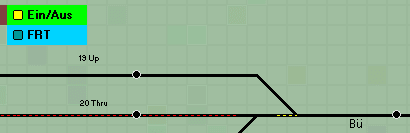
One first indicates the 'origin' of the path one wishes to set. As usual, either a mouse click or pressing a physical button connected to a sensor will work, the rare difference here is that the mouse click toggles the first button on, so that one can then click the second button too.
Once a valid destination is pressed, the software checks that the required tracks are clear, and are not reserved by another train, and then the route is set. That has the effect of setting all the turnouts and signals as needed.

Now, humans being what they are, demand that there is also the need to be able to undo things. So an operator may need to 'unreserve' a route or to take such a route back. Naturally, the Germans have a button for this too, which is abbreviated on the desks as "FRT"


The prototype demands that the signalman presses FRT and then indicates the route to be undone by pressing the origin and destination buttons again. To make things simpler, my software simply asks for the destination button to be pressed again while the FRT is held on. Once actuated, the route is released. The FRT is automatically turned off if using a mouse instead of a physical button.
Axle counters
In real life, axle counters are often deployed so that the operators can check that the number of axles that came into a track matches the number of axles that left. If fewer axles left there may be some rolling stock left in the track. Various levels of sophistication are possible; simple counters that have to be reset and inspected manually, counters that are matched to each other and can automatically compare results, etc. Since our model layouts do not have actual axle counters I decided to simulate them.
Axle counters can be associated with any track sensor. If running the layout under full computer control in which the computer 'knows' which train is present on the track in question, then the axle counter will count up by the exact number of axles for that train, once each time each train passes through. (The number of axles is configured in the train definition.) If one is running trains about manually, (i.e. not computer controlled) one can configure each counter to increment by some number every time the sensor is activated. So, for example, if one typically runs passenger trains with double axle bogeys, and the track sensor is likely to trigger once for each pair, then one could select the counter to increment by 4 each time. If you have a long occupancy type sensor, that will trigger once for each train, then one can add a higher number, such as 28 each time.
Since pairs of axle counters would not be likely to differ if rolling stock was left behind (using exact axle counts) or even match when using some increment value and nothing was left behind, these axle counters are cosmetic in nature. I therefore don't bother resetting them to zero, it is fun to see how many axles have been passed the points over time.
Train names
Some of the more modern desks are able to display the train number in track that are reserved or already occupied. Red text indicates the train is present, and white indicates that it is not yet present, but reserved for the train. This was almost trivial to implement since my software already knows the timetable names of each train, where each train is, and what tracks have been reserved for which trains. Train "H 334" is present, as is "S5".
The third track down is vacant and unreserved.
The 4th track is reserved for "SZ Wür"
(The white panels are platforms)
It is great seeing the train names propagate along the route as the track is booked, and then turn from white to red as the train arrives, and finally go blank once it has left.
Pictures
Photographs of the prototypes show all sorts of additional stuff, such as magnets for blocking things, indicators about local conditions, etc. I therefore made it possible top position any graphic anywhere on the screen, so stickers for the local 'Kneipe' or more official signs can be placed as needed.Desk Tiles
Every time the software loads, it generates the tiles that make up the desk. 10% of the tiles have a slightly different color to simulate the different shades one sees in the real thing. (Tiles that have replaced defective ones are clean and bright)Button types
In addition to showing some sort of status, there are two main types of button with differing behavior. There are buttons that toggle on or off (square shaped indicator), and buttons that just do something when activated (round indicator).In these examples, the Power is indicated as 'on' and clicking it will toggle the power on and off.
'Allow sounds' is currently off, but can be toggled on just like the power control. Since sounds are turned off, the Announcements button is disabled, as indicated by its gray color. The Intellibox button indicates there is connection to the Intellibox and if off, clicking it will attempt to connect

The following types of buttons have been implemented:
- Track Power status
- Halt mode status
- Dispatcher status (main heartbeat of the software)
- Ignore unexpected s88 events
- Allow sounds
- Allow station announcements
- Auto switching of steam
- Allow route chaining
- Relaxed stopping (allows train to stop in any tracks)
- Reset interface to Intellibox
- Clear all shunting reservations
- Cancel all scheduled trains
- Stop all locos that should not be moving
- Show track names
In addition to the buttons above, any event can be triggered with a such a button. Here is a cluster of sound events that can be triggered with a single click:
Control software and user interface design is © Copyright Dale Schultz 2018