This means that I essentially had to add an HTTP server to my software, and generate the HTML pages dynamically. It took a couple of weekends and I am very pleased with the results.
The main functional features are:
1. Switching the layout power.
Power can be switched on, off, or the 'halt mode' can be set on. These controls are available at the top of every screen (including the '404 not found page!).
This ensures that the power can always be switched off in case of emergency, such as a derailment.

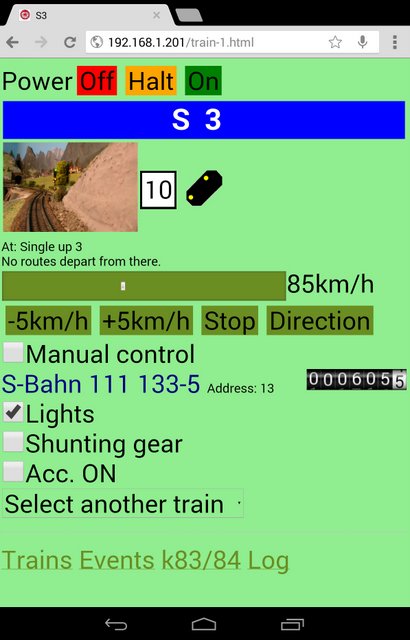
2. Cab type control of a train.
This is the most complex of all the screens. Selecting any train that is on the layout will display the following items:
- Train name.
- Image of the track in front of the train.
- German railways speed limit sign for the track the train is on.
- Any signals visible from the front of the train, showing the current aspect.
- The name of the track the train is on.
- Either the current destination of the train, or if not on a route, a list of routes that can be initiated.
- A speed control slider and the current speed of the train.
- Buttons to adjust speed by 5km/h, stop, or change direction.
- A checkbox to indicate the train speed id being controlled manually instead of the software controlling the speeds.
Then, for each locomotive that is in the train:
- Loco name and digital address,
- An animated actual odometer that rolls according to the current speed of the train,
- A checkbox to switch each loco function on or off,
The loco page refreshes every 3 seconds so that as a train moves along its route, one can see the track, signals, speed, etc. in real time.
Here is a sample screen
Update:
The signals are now positioned precisely in the images of the tracks. Here is an example taken from the Underground S-Bahn station:

and a video of running a train from the screen:
(I had not yet taken the photographs along the route when this video was made.)
I intend making the following improvements to the individual train page:
a) Fetch updated data in the background instead of refreshing the whole page.
b) Show the desired speed of the train, and train speed limit, in addition to the current speed.
c) Make the train speed display match that of the prototype
3. Triggering events.
This page shows all the events that have been defined to be activated with buttons or checkboxes. This excludes automatic events that are runs on start-up and helper events that would not make sense to be activated directly. Typically the events that appear here are things such as sound effects, or switching lights and accessories on and off.
Here is a video of the events screen:
4. Direct switching of electromagnetic items.
This is mostly a troubleshooting tool. If a turnout is sticking or not reacting is it very useful to be able to activate it from wherever the turnout is on the layout so one can see or feel the mechanism.
Setting turnouts:
5. Viewing the log.
Rather boring, just a copy of whatever is on the system log.
© User Interface design and software is copyright by Dale Schultz (2014) except for the odometer which is by Mark Crossley.