Showing posts with label track. Show all posts

2022-05-31

Märklin turnout motor 7549 reliability

For many years I have used a tip I read online about disabling the electrical switch mechanism in the Märklin K-track turnout motors. As I made the modifications to my last few motors I decided to show what I do and took some pictures of the steps.

Note that over the years the shape of the Märklin 7549 turnout motors have changed. This post applies to the older version which can still often be found at train fairs and the second hand market.

The turnout motor comprises two solenoids that pull the mechanism in either direction. The design includes an electrical cut-out to prevent the coils from remaining energized after fully actuating. This prevents the coils from overheating and melting the plastic thus allowing the motor to survive being switched with continuous current. Unfortunately the physical switch adds a tiny amount of load to the mechanism and this sometimes causes the motor to not fully switch. Since I switch all my turnouts with a pulse (and my software is stable enough to not forget to switch the current off after each pulse) I remove the physical switch to reduce the possibility of needing to pull the motor out of the layout due to failure.

In addition to removing the switch, I also lubricate the mechanism with graphite powder.

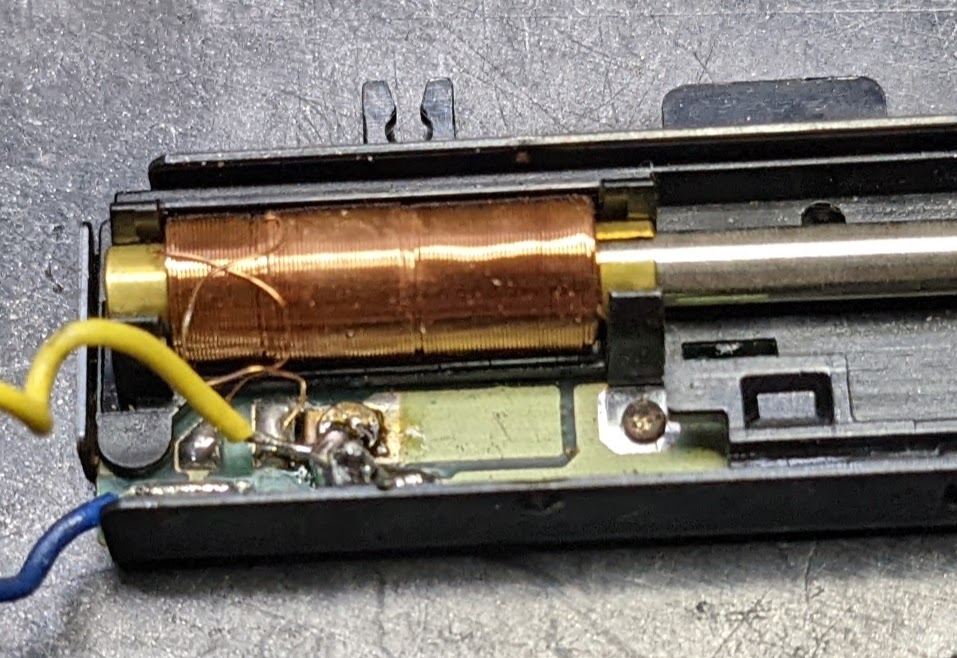
The plastic cap of the switch motor simply pops off revealing the two coils and the mechanism that slides up and down.


The yellow wire provides power and the two blue wires complete the circuit when grounded. Two copper leaves isolate the 'yellow' power from the ' blue' ground depending on the motor position. This means that when the mechanism has been pulled to the right, the right hand coil is switched off and vice versa.

Removing the two switches

Disclaimer

It is sad that one needs to explicitly say this, but modifying a switch motor may result in its destruction. The modification described here is not reversible. It is a permanent modification. I am not responsible for anything that may result from anyone attempting to follow what I describe here. That includes damage to any switch motors, tools, trains, power systems, bodily injuries and psychological effects, loss of warranty, or any other nonsensical claims against me.

The first step is to pull up one of the copper leaves. I push the mechanism to the left and then pull out the right hand leaf. I use some tweezers to grab it and pull it out from underneath the plastic slider.

Pulled up

Once it is pulled up past the plastic slider, I fold it back and forth to cause it to break off at the circuit board due to metal fatigue. 


Three or four motions left and right are normally enough to break it off.


I repeat all that on the other side too.

Now, since I have removed the switches, current from the yellow wire can never reach either coil. So I have to bridge the connection on the left and right.

Fortunately there are solder pads I can use! I bridge the two pads marked A and B where the red line is in this photograph:


Right hand side done:

I do the same on the left, making sure that the yellow wire remains connected.

If I find that I end up with a big blob of solder bridging the pads, I check that it does not foul the end of the moving mechanism. If it does, I simply snip off the end of the plastic as can be seen above.

At this stage it is prudent to test that the motor actuates in both directions. I hold the bare end of the yellow wire onto a yellow wire from a 16V AC transformer and then alternately ground (brown) each of the blue wires for just a moment. As each blue wire is grounded it should snap the mechanism left or right.

Lubrication of the mechanism

These switch motors are not expected to be lubricated, but I lubricate mine using graphite powder. 

I dip a small screwdriver into the powder and tap it where the plastic mechanism slides against other parts.


I also try to get some into the area where the tongue actuator moves in and out of the motor..


I then move the mechanism up and down a bunch of times to get the powder in place. One can feel how easy the movement becomes.


2020-05-20

Märklin 2271 turnout shorted by loco slider

I was running a train one some newly laid track when the layout got shorted out. I have a 3A fast blow fuse protecting the booster and the fuse blew.

Close inspection showed that when the loco moved slowly, (along the straight part,) its pickup shoe would bridge the outer rail, and get the leading edge onto the studs on the far side, and then the rear end would drop down and land on the crossing running rail. This of course created a solid short circuit. Nasty.


2020-04-25

Track laying in lower section of expansion complete

I have now completed the track laying in the lower section of the layout expansion.


The lower hidden area has 9 storage tracks.

  • 7 of the tracks can handle trains 184cm long
  • 1 can handle a train of 201cm
  • 1 can handle two trains of  330cm, and 322cm, or one that is 6.52m long.

(The purpose of expansion area was to store shortish trains, as I have 8 long storage tracks in my existing hidden station.)

Once the trains have passed through the fiddle yard (or bypassed it) they climb at 2% up towards the turning loop area:

Two tracks come out of the lower level, and on the way to the turning loop they run parallel to the two tracks that will go to the upper section. This area will have scenery, and I have mounted the plywood for the backdrop.

All four tracks then come together to pass behind our water heater where they travel along a curved section with safety barriers.


The turning loop, can hold two trains (261cm and 251cm) or a single 5.12m train The practical limit for trains running through the extension is therefore 5.12m.

The turning loop area is horizontal so I added a bit of a valley and bridge to add some interest:

The rear track against the wall will be covered by a mountain so that one does not see a train track doing a 180° turn. The rear track will be accessible from below via the holes in the plywood.

A backdrop is also planned to go behind the mountain and wrap around to hide part of the water heater.

Technical stuff


  • For the fiddle yard I decided to use a 13.5 cm stopping area before the turnouts in each track.
  • I also decided to use 3 sensors per track (instead of 4), one at each end and one exactly in the middle. This allows the middle sensor to be used as the slow down section in both directions. This approach will save the expense of 18 sensors for the project.
  • The new area provides a lot more flexibility in routing trains, so I decided to implement the ability to dispatch trains to a destination, rather than only along specific routes. I can now define an event on the screen that will dispatch any train in a track to a specific destination with a single click. Clicking on any track with a train also lets one pick any destination, or activate specific routes.
  • The long tracks that go towards the turning loop do not allow stopping in the direction of the loop. This ensures that a train already booked into, or already in, the loop cannot get trapped there by trains on the incoming tracks. Stopping is permitted on the way out towards the fiddle yard or on the long tracks.
  • 24 turnouts have been laid, turnout switches installed, and connected to k83 type modules.
  • 44 sensors have been made by isolating sections of track, and connected to s88 type modules, usually via a 36' long Cat-5 cable holding 8 wires, about 200' of cable. (I used cable my dear wife picked up at the dump!)
  • About 436 electrical connections made!
  • The layout now has about 271m of track!

Here is the schematic on my control screen of the lower section and the turning loop. The upper fiddle yard (still to be built) is on the left.

Earlier report: https://cabin-layout.mixmox.com/2020/03/storage-expansion1.html
Backdrops done: https://cabin-layout.mixmox.com/2020/06/storage-expansion3.html

2019-08-28

Superelevation of track

Train tracks are 'banked' through curves to reduce rail wear and to make travelling through the curve more comfortable for passengers. This is called superelevation.

The raising of the outer rail gives a train a twisting effect as it transitions into and out of curves, and this twisting can also be achieved on a model, by lifting the outer rail too. The trains look more realistic as they go through curves simply because they behave more like the real thing.

The European association of Modelrailroader and Railroad Friends have a standard (NEM 114) for the amount of superelevation that should be added at various scales and they suggest 1.5mm for HO scale. Personally, I find this too small and I prefer 2mm to see a more noticeable effect.

To give my tracks the tilt I wanted, I made a bunch of tiny wooden wedges that I could insert underneath the roadbed of the track.

In order to make such thin wedges, I placed the blade of my table saw slightly off vertical. I then pushed some pine lumber (2x4) through the blade. I then flipped the lumber over and made a second cut, producing a fine wedge. Every flip and cut produced another wedge.


2016-11-27

Distance markers

One of the details on my layout is the inclusion of distance markers along the tracks. These signs tell the locomotive engineers where they are. They typically appear every 200m along the track. The upper number indicates the number of kilometers from the origin and the lower number indicates the the additional hectometers.

2015-11-28

Merkur ballast

For Märklin K-track I really like the ballast called Merkur Stryroplast.  This is a 5mm thick roadbed that is formed in the shape of the K-track pieces. This allows the K-track to be simply pressed into place. One may need to cut some of the ballast to fit surrounding areas, but that is done really easily with a work knife.

I have put this page together to show some of the aspects of working with the Merkur range.

2015-07-26

Design tip: station sidings

I have noticed on a number of on-line sites that people often wisely upload their track layout design for feedback. I have also noticed that many of the layout designs include tracks that have numerous bends in them. S-shaped bends are not good for two reasons:

2015-06-22

Laying track in the right place

When laying track using flex track one does need to take care to get the curves even, and,  straight tracks must be dead straight. If tracks are not laid straight one sees the kinks very easily when a train runs along the track. For some reason the movement of the trains draws attention to any kinks and bumps.

2015-04-12

Construction of roadbed

For the big loop of my mainline, I need to run a double mainline around a room where there are no walls to fasten any benchwork to. In addition, the track has to maintain a constant gradient of 1.6% along the length of the loop.

I wanted to minimize the 'bumps' that can appear when track transitions from one support to another so I have decided to use 3/4" plywood that is firmly screwed onto vertical 2x4 pieces of lumber. I am hoping that the strength of the 2x4 lumber will prevent any sagging and warping over time. Here is an example showing how the tracks will sit on a wide roadbed.


2015-03-28

Main station tracks laid

Much of the work thus far has been on parts of the layout that are functional in nature but contribute less to the overall visual impact. That is now changing as I have completed the hidden sections of track and can now start building the visible areas of the layout - making the work much more interesting and at the same time, more demanding.

The main station area has no had all eight tracks laid, wired up, measured, defined in the software, and tested under computer control.

2014-08-12

Looking more like a train layout

Now that I have some more bench-work in place over the hidden sidings, I was able to place some track to get a feel for where it will all go.

2014-04-27

S-Bahn layer tryout

As my track laying efforts approach the S-Bahn station area I decided that I need to see how it will all be laid out.

The S-Bahn station is an underground station underneath the main station. Trains will enter and leave the area from the hidden station at one end or from the mainline in the opposite direction. Apart from the side view of the underground station from the side, all the track will be hidden from view.

This shows the old S-Bahn platforms and backdrop positioned where the S-Bahn station will be. It has two tracks which both connect to the mainline at the back of this image.

2014-03-24

Progress in the Schattenbahnhof

I have been laying lots of track in the hidden station. The Station is almost 8 meters long and contains 8 tracks. I am now just over half way in laying and testing all the tracks.

6 of the 8 tracks are divided into 3 sections each and the other 2 are divided into 2 sections each. A train longer than one segment can occupy more than one segment as needed.

 So a maximum of 22 trains can be stored, or 8 long trains could be stored.

The tracks range from 6m to 7.9m long with segments ranging from 3m to 3.8m. Each segment has at least three s88 detection points to enable train progress to be monitored and controlled. Those detection point are what take all the time to lay the track.


2014-01-01

First track laid

After 8 years I once again laid some track!

Since I am reusing track from the previous layout it is a bit more tricky to use pieces that were cut previously etc. but I expect things to speed up now that I have most things in place.

I started at one end of the lower hidden track area. I also made a template to easily see the correct track spacing from the rear wall.

The trusty BR216 with a Märklin 6080 decoder showed that all is working.

2013-10-19

Track underlay installed

I decided to use relatively cheap sill seal foam to lay underneath the tracks in the hidden areas.

I bought the underlay at Lowe's -  5½" Sill Seal Roll Item #: 13281 and it comes in 50' lengths.
I stapled it to the plywood and then I placed some track on top of it to temporarily get a feel for how the tracks will look. Many of the tracks shown here have the Merkur Styrolplast ballast in place - I will use that in visible areas.


2011-03-05

Märklin turnout-lantern 7547

I have some K-track turnout lantern sets and I decided to install some today.


2008-01-30

Buffer weathering

Although nicely designed, I find the Märklin track buffers too sterile but this is fairly easily rectified with a bit of painting


2006-12-10

Old M-track

I have eight lengths of old straight M-Track that are significantly different to all my other M-track..

The length of each piece is 224mm instead of the usual 180mm standard length.
There are stud contacts that protrude from plastic ties.

The top piece in this picture is the usual type of studded M-Track 180mm long.
The middle and lower lengths are the longer type, showing the plastic underside mounted within the metal roadbed.

Information from Koll's catalog (1990)
These 3900 series tracks were the first to have stud contacts, replacing the solid center rail that has been used until then. They were introduced in 1953, initially with a copper contact for the center rail and in 1954 the contact was replaced with the wider nickel plated contacts as seen above.

2006-11-20

Philosophy of digital train control

Background

Controlling model trains with a computer has been around since 1986 when Märklin introduced their digital system. Since then there have been numerous improvements and a wealth of new digital items and products. Some things have, however, remained the same. All digital systems consist of decoders (usually in locomotives) and they are all controlled by computers, even if the computer does not look like a computer. The Märklin digital controllers, the Intellibox, ECoS and Viessmann controllers are all computers. Some of these controllers also allow computer input from general purpose computers such as PCs and Macintosh machines and allow greater flexibility and power in controlling a train layout digitally.

2005-07-06

Laying K-track

I have just a little bit of track left to wire up so I decided I had better document how I do it before I have nothing left to photograph...